
 0
0



- Home
- Knowledge
- Screen Printing Process
- Curved Screen Printer Setup Tutorial Part 2: Squeegee & Ink Blade Tuning
Curved Screen Printer Setup Tutorial Part 2: Squeegee & Ink Blade Tuning
FA-400 RSN semi-auto curved screen printer tutorial video Part 2

1.Squeegee position adjustment.
-
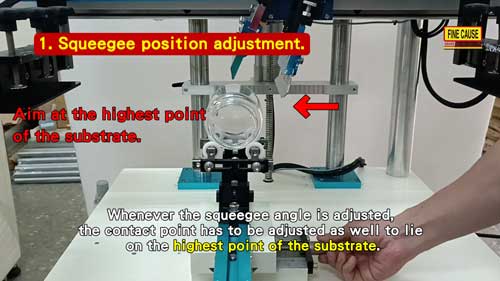
Remove the screen stencil. Adjust the height of squeegee stand so the squeegee can be fixed properly.
-
Adjust the angel of the squeegee.
-
When the diameter tolerence of the substrate is wider, we could set a greater angle to the squeegee to aim at the highest point of the substrate.
-
※Whenever the squeegee angle is adjusted, the contact point has to be adjusted as well to lie on the highest point of the substrate.
-
Make sure the contact point is right at the substrate's highest point; otherwise, problems like shadow effect and ink overflow will easily occur.
(Note: If your substrate's geometry is too irregular or highly contoured to lock onto a reliable highest contact point, curved screen printing may face physical limits. For these complex cylindrical or spherical shapes, pad printing is often the industry-recommended alternative. Check our Pad Printer Guide: How to Choose the Right Pad Printing Machine to evaluate the best printing methodology for your product.)
2. Ink blade position adjustment.
-
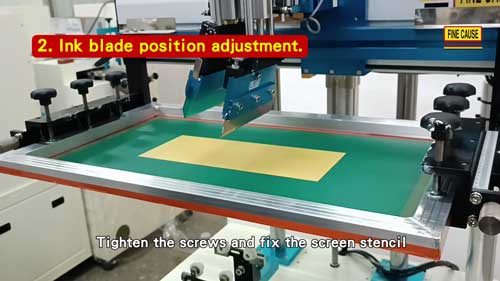
Take out the substrate and put the ink blade on. Set an approximate height and level in the down position. Be sure the down position is at least 5mm higher than the screen stencil. 【For more precise position】Make subtle adjustment when the screen stencil is installed.
-
Have the squeegee stand in the up position and install the screen stencil. Adjust the left and right position of the screen stencil. Make sure the image is at the correct place of the substrate. Tighten the screws and fix the screen stencil
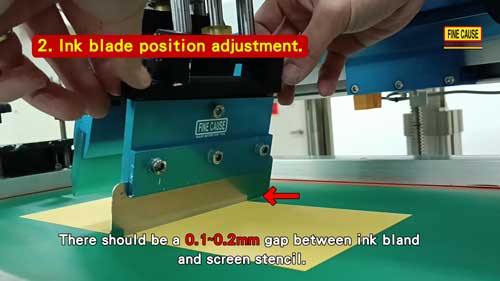
- Make subtle adjustment on the level and height. There should be a 0.1~0.2mm gap between ink bland and screen stencil. Ink blade should not be in contact with screen stencil.
💡 Engineering Note for Flawless Ink Preparation:
Adjusting the squeegee and ink blade is critical for geometric precision, but perfect surface cosmetics also depend on ink quality. High-viscosity UV or functional inks often trap micro-bubbles during manual preparation, leading to pinholes and voids on curved substrates. To eliminate these sub-micron defects, industrial leaders utilize our Vacuum Planetary Centrifugal Mixer to achieve a 100% bubble-free, perfectly homogenized blend within 60 seconds without material cross-contamination.


Article Classification
Recent Articles
- Curved Screen Printer Setup Part 3: Range & Printing
- Curved Screen Printer Setup Tutorial Part 2: Squeegee & Ink Blade Tuning
- Curved Screen Printer Setup Tutorial Part 1: Jig & Stencil Alignment
- Manual 4 Color Screen Printing Machine (T-shirt printing machine) Assembly/Printing Tutorial
- Screen Making Guide: Critical Details for Flawless Screen Printing